Here is the dd command
dd if=FreeBSD-14.2-RELEASE-amd64-memstick.img of=/dev/da1 bs=1M conv=sync status=progress
Here is the dd command
dd if=FreeBSD-14.2-RELEASE-amd64-memstick.img of=/dev/da1 bs=1M conv=sync status=progress
Go to https://github.com/massgravel/Microsoft-Activation-Scripts and follow the instructions.
Or download Windows LTSC (Long-Term Servicing Channel) from https://massgrave.dev/windows_ltsc_links#win11-iot-enterprise-ltsc-2024
Windows LTSC is intended for IoT and does not require a product key.
If so try installing the libnsl package via the command dnf install libnsl then then try deploying again!
vCenter Server 8.0 appliance deployment fails while performing vCenter server 8.0 deployment using a UI installer on the RHEL 9 operating system, the deployment wizard fails with an error message: A problem occurred while reading the OVA File: TypeError: Cannot read properties of undefined reading 'length'.
On the RHEL operating system, install the libnsl package using the command
dnf install libnsl.
Ensure to configure the required repositories prior to execution of the command.
#VCSA, #OVF, #OVA
I have just finished my first VMware vSAN ESA Plan, Design, Implement project and had a chance to test vSAN ESA performance. Every storage should be stressed and tested before being put into production. VMware's software-defined hyperconverged storage (vSAN) is no different. It is even more important because the server's CPU, RAM, and Network are leveraged to emulate enterprise-class storage.
Step 1: upload the VMware-ESXi-8.0U3b-24280767-depot.zip file to a datastore accessible by the host.
esxcli software sources profile list -d /vmfs/volumes/[datastore]/VMware-ESXi-8.0U3b-24280767-depot.zip
esxcli software profile update -d “/vmfs/volumes/[datastore]/VMware-ESXi-8.0U3b-24280767-depot.zip” -p ESXi-8.0U3b-24280767-standard
cd /usr/lib/applmgmt/support/scripts
./software-packages.py stage --url --acceptEulas
./software-packages.py list --staged
./software-packages.py validate
./software-packages.py install
Download the VCSA patch which should end with FP.iso from support.brocade.com > selecting VC and the version.
Upload the file to a datastore and map it to the VCSA VM through CD / DVD Drive option.
Patch the VCSA from CLI.
Run the following commands
software-packages.py stage –-iso
software-packages.py list –-staged
software-packages.py install –-staged
Reboot the VCSA VM.
This should patch the VCSA
#!/bin/bash
sshfs david.pasek@gmail.com@sftp.virtix.cloud:./ ~/mnt/sftp -p 55022
Web Admin Management Interface (SunStone) is at https://[IP]:2616
Main Admin User Name: oneadmin
Default network is 172.16.100/24
Source: https://vmattroman.com/monitoring-vmware-vsphere-with-zabbix/
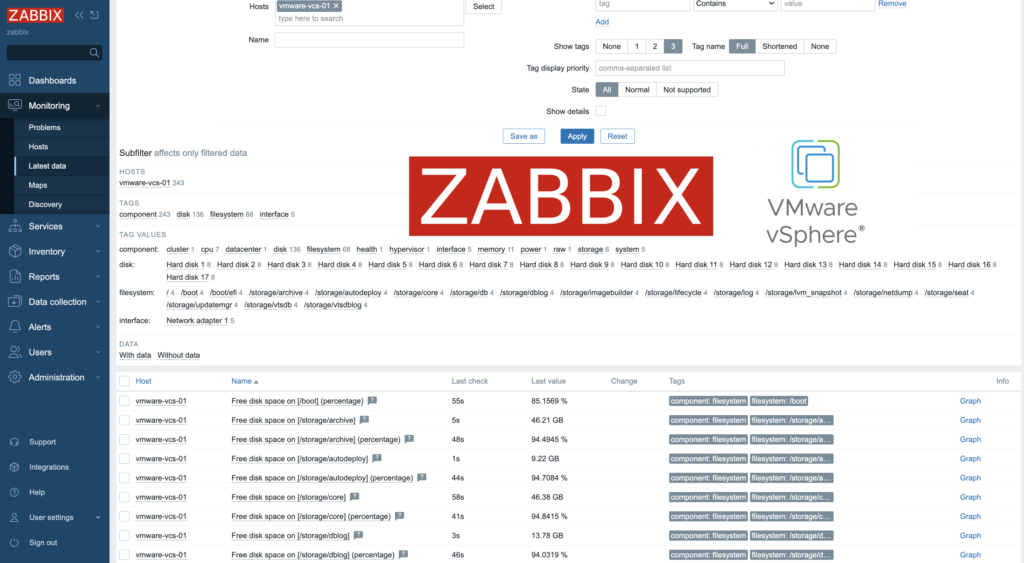
Zabbix is an open-source monitoring tool designed to oversee various components of IT infrastructure, including networks, servers, virtual machines, and cloud services. It operates using both agent-based and agentless monitoring methods. Agents can be installed on monitored devices to collect performance data and report back to a centralized Zabbix server.
Zabbix provides comprehensive integration capabilities for monitoring VMware environments, including ESXi hypervisors, vCenter servers, and virtual machines (VMs). This integration allows administrators to effectively track performance metrics and resource usage across their VMware infrastructure.
In this post, I will show you how setup Zabbix monitoring with VMware vSpehre infrastructure.
Jak zabránit čekání na obnoveni NFS datastore při startu ESXi?
Když vám ESXi odmítá startovat 1-2 hodiny, protože se pokouší připojit NFS datastore, které jsou dávno odstraněné.
Source: https://vmattroman.com/backup_

In some cases we need to reinstall ESXi host. To avoid time consuming setting up servers, we can quickly backup and restore host configuration. To achieve this, there are three possible ways: ESXi command line, vSphere CLI or PowerCLI.
In this article I will show how backup and restore host configuration data using ESXi command line.
ESXi host Purple Screen of Death (PSOD) happens when VMkernel experiences a critical failure. This can be due to hardware issues, driver problems, etc. During the PSOD event, the ESXi hypervisor captures a core dump to help diagnose the cause of the failure. Here’s what happens during this process.
List devices
esxcli storage core device list
Get S.M.A.R.T information
[root@esx24:~] esxcli storage core device smart get -d t10.NVMe____KINGSTON_SNVS1000GB_____________________55FA224178B72600
[root@esx24:~] esxcli storage core device smart get -d eui.0000000001000000e4d25c0f232d5101
The output looks like this

VMware KB: https://knowledge.broadcom.com/external/article/314303/displaying-smart-data-for-nvme-devices-i.html
sudo dnf -y groupinstall "Xfce"
sudo systemctl set-default graphical.target
List VMs and their uplinks.
netdbg vswitch instance list
Capture DHCP traffic (udp 67, udp 67) n vmnic0 interface and send it to tcpdump to filter DHCP communication.
pktcap-uw --uplink vmnic1 --capture UplinkRcvKernel,UplinkSndKernel -o - | tcpdump-uw -r - udp port 67 or udp port 68
This is the tcpdump command to display attempts to open TCP connections (TCP SYN) from IP address 192.168.123.22
pktcap-uw --uplink vmnic4 --capture UplinkRcvKernel,UplinkSndKernel -o - | tcpdump-uw -r - 'src host 192.168.123.22 and tcp[tcpflags] & tcp-syn != 0 and tcp[tcpflags] & tcp-ack == 0'
-n → Do not resolve hostnames.-i <interface> → Specify the network interface (e.g., eth0).'src host 192.168.123.22' → Filter packets from the source IP 192.168.123.22.'tcp[tcpflags] & tcp-syn != 0' → Match packets where the SYN flag is set.'tcp[tcpflags] & tcp-ack == 0' → Ensure the ACK flag is not set (to exclude SYN-ACK responses).
Source: https://nvidianews.nvidia.com/
This is a bit of a cut'n'paste of a document I wrote for internal use and although it probably over-answers your question I thought I'd put it on here in case it's of use to you or others OK.
Login to the machine as root or sudo each of the following commands, enter fdisk –l, you should see something like this;
Disk /dev/sda: 21.1 GB, 21xxxxxxxxx bytes
255 heads, 63 sectors/track, 5221 cylinders
Units = cylinders of 16065 * 512 = 8225280 bytes
   Device Boot      Start         End      Blocks   Id  System
/dev/sda1   *           1          13      104391   83  Linux
/dev/sda2              14        2610    20860402+  8e  Linux LVM
In this case I've altered the values but as you can see this machine has a single ~20GB root virtual disk with two partitions, sda1 and sda2, sda2 is our first LVM 'physical volume', see how LVM uses a partition type of '8e'.
Now type pvdisplay, you'll see a section for this first PV (sda2) like this;
  --- Physical volume ---
PV Name               /dev/sda2
VG Name               rootvg
PV Size               19.89 GB / not usable 19.30 MB
Allocatable           yes (but full)
PE Size (KByte)       32768
Total PE              636
Free PE               0
Allocated PE          636
PV UUID               PgwRdY-EvCC-b5lO-Qrnx-tkrd-m16k-eQ9beC
This shows that this second partition (sda2) is mapped to a 'volume group' called 'rootvg'.
Now we can increase the size of the virtual disk using the usual vSphere VSClient by selecting the VM, choosing to 'edit settings', then selecting 'Hard Disk 1'. You can then increase the 'Provisioned Size' number – so long as there are no snapshots in place anyway – and select OK. This will take a few seconds to complete.
If you then switch back to the Linux VM and enter
echo "- - -" > /sys/class/scsi_host/hostX/scan
where the X character is likely to be zero, it will perform a SCSI bus rescan, then run fdisk –l, you should see something like;
Disk /dev/sda: 42.2 GB, 42xxxxxxxxx bytes
255 heads, 63 sectors/track, 5221 cylinders
Units = cylinders of 16065 * 512 = 8225280 bytes
   Device Boot      Start         End      Blocks   Id  System
/dev/sda1   *           1          13      104391   83  Linux
/dev/sda2              14        2610    20860402+  8e  Linux LVM
You'll see that the disk size has increased, in this case to ~40GB from ~20GB but that the partition table remains the same.
We now need to create a new LVM partition, type parted, you should see something like this;
GNU Parted 1.8.1
Using /dev/sda
Welcome to GNU Parted! Type 'help' to view a list of commands.
(parted)
You'll now need to create a new partition for the extra new space, type 'p' to see the current partition table such as this;
Model: VMware Virtual disk (scsi)
Disk /dev/sda: 42.9GB
Sector size (logical/physical): 512B/512B
Partition Table: msdos

Number  Start   End     Size    Type     File system  Flags
 1      32.3kB  107MB   107MB   primary  ext3         boot
 2      107MB   21.5GB  21.4GB  primary               lvm
Then type mkpart, then select 'p' for 'Primary', for file system type enter 'ext3', for start enter a number a little higher than the combination of both 'sizes' listed above (i.e. 107MB + 21.4GB, so say 21.6GB), for end type the size of the disk (i.e. in this case 42.9GB). Once you press enter it will create this new primary partition, type 'p' to show the new partition table, you should see something like;
Model: VMware Virtual disk (scsi)
Disk /dev/sda: 42.9GB
Sector size (logical/physical): 512B/512B
Partition Table: msdos

Number  Start   End     Size    Type     File system  Flags
 1      32.3kB  107MB   107MB   primary  ext3         boot
 2      107MB   21.5GB  21.4GB  primary               lvm
 3      21.5GB  42.9GB  21.5GB  primary               ext3
You'll see that the new partition started after the first two and fills the available space, unfortunately we had to set it to a type of 'ext3', so let's change that.
Type 't', then the partition number (in our case 3 as it's the third partition), then for the 'hex code' enter '8e' – once you'd done this type 'p' again and you should see it change to 'Linux LVM';
Disk /dev/sda: 42.9 GB, 42949672960 bytes
ads, 63 sectors/track, 5221 cylinders
Units = cylinders of 16065 * 512 = 8225280 bytes

Device Boot      Start         End      Blocks   Id  System
/dev/sda1   *        1          13      104391   83  Linux
/dev/sda2           14        2610    20860402+  8e  Linux LVM
/dev/sda3         2611        5221    20972857+  8e  Linux LVM
Now we need to create a new LVM 'physical volume' in this new partition, type pvcreate /dev/sda3, this should then create a new LVM PV called /dev/sda3, type pvdisplay to check;
--- Physical volume ---
PV Name               /dev/sda3
VG Name
PV Size               20.00 GB / not usable 1.31 MB
Allocatable           no
PE Size (KByte)       0
Total PE              0
Free PE               0
Allocated PE          0
PV UUID               gpYPUv-XdeL-TxKJ-GYCa-iWcy-9bG6-tfZtSh
You should see something similar to above.
Now we need to extend the 'rootvg Volume Group', or create a new one for non-root 'volume group', type vgdisplay to list all 'volume groups', here's an example;
--- Volume group ---
VG Name               rootvg
System ID
Format                lvm2
Metadata Areas        2
Metadata Sequence No  19
VG Access             read/write
VG Status             resizable
MAX LV                0
Cur LV                8
Open LV               8
Max PV                0
Cur PV                2
Act PV                2
VG Size               21.3 GB
PE Size               32.00 MB
Total PE              1276
Alloc PE / Size       846 / 26.44 GB
Free  PE / Size       430 / 13.44 GB
VG UUID               tGM4ja-k6es-la0H-LcX6-1FMY-6p2g-SRYtfY
If you want to extend the 'rootvg Volume Group' type vgextend rootvg /dev/sda3, once you press enter you should see a message saying the 'volume group' has been extended.
If you wanted to create a new 'volume group' you'll need to use the vgcreate command – probably best call me for help with that.
Once extended enter vgdisplay again to see that the 'rootvg' 'volume group' has indeed been extended such as here;
--- Volume group ---
VG Name               rootvg
System ID
Format                lvm2
Metadata Areas        2
Metadata Sequence No  19
VG Access             read/write
VG Status             resizable
MAX LV                0
Cur LV                8
Open LV               8
Max PV                0
Cur PV                2
Act PV                2
VG Size               39.88 GB
PE Size               32.00 MB
Total PE              1276
Alloc PE / Size       846 / 26.44 GB
Free  PE / Size       430 / 13.44 GB
VG UUID               tGM4ja-k6es-la0H-LcX6-1FMY-6p2g-SRYtfY
You can see the 'VG Size' is as expected.
Now we need to extend the 'logical volume', type lvdisplay to show our 'logical volumes', you'll see something like;
--- Logical volume ---
LV Name                /dev/rootvg/var
VG Name                rootvg
LV UUID                NOP1jF-09Xt-LkX5-ai4w-Srqb-xGka-nYbI2J
LV Write Access        read/write
LV Status              available
# open                 1
LV Size                3.00 GB
Current LE             320
Segments               3
Allocation             inherit
Read ahead sectors     auto
currently set to       256
Block device           253:2
If we want to expand the /var file system from 3GB to 10GB then type lvextend –L 10G /dev/rootvg/var, now type lvdisplay again, you'll see the 'logical volume' has grown to 10GB;
--- Logical volume ---
LV Name                /dev/rootvg/var
VG Name                rootvg
LV UUID                NOP1jF-09Xt-LkX5-ai4w-Srqb-xGka-nYbI2J
LV Write Access        read/write
LV Status              available
# open                 1
LV Size                10.00 GB
Current LE             320
Segments               3
Allocation             inherit
Read ahead sectors     auto
currently set to     256
Block device           253:2
Now the last thing we need to do is to grow the actual file system, this doesn't have to use all of the newly added space by the way. Enter df –h to show the current filesystems, here's an example;
Filesystem            Size  Used Avail Use% Mounted on
/dev/mapper/rootvg-root
                      2.0G  1.4G  495M  74% /
/dev/mapper/rootvg-home
                      248M  124M  113M  53% /home
/dev/mapper/rootvg-var
                      3.0G  1.1G  1.8G  30% /var
/dev/mapper/rootvg-usr
                      3.0G  936M  1.9G  34% /usr
/dev/mapper/rootvg-opt
                      3.0G  811M  2.0G  29% /opt
If we want to expand the /var file system from 3GB to 10GB then type resize2fs /dev/mapper/rootvg-var (or on CentOS maybe xfs_growfs /dev/mapper/rootvg-var, or similar commands depending on the type of file system). When you press enter the actual filesystem will grow, this may take time, enter df –h once completed to check.
Filesystem            Size  Used Avail Use% Mounted on
/dev/mapper/rootvg-root
                      2.0G  1.4G  495M  74% /
/dev/mapper/rootvg-home
                      248M  124M  113M  53% /home
/dev/mapper/rootvg-var
                      9.88G  1.1G  8.2G  12% /var
/dev/mapper/rootvg-usr
                      3.0G  936M  1.9G  34% /usr
/dev/mapper/rootvg-opt
                      3.0G  811M  2.0G  29% /opt
You're now finished!